CyberArk Secret management for SCALE
SCALE DevOps Pipeline v4.6 introduces CyberArk Integration with Rancher. Conjur performs certificate-based authentication with each Rancher cluster and securely supplies secrets to each namespace/application within the cluster. Secrets are securely stored in the CyberArk vault and securely supplied. You would need to upgrade your pipeline version to v4.6 to use this cyberark integration.
Safes created for your application
We have provisioned 6 safes for each application for your team to use:
3 Application Safes: Each safe is designated for a specific landscape. Application teams should store their application secrets here, based on the landscape they belong to.
| Safe Names | Landscape |
|---|---|
| S-P-C-RNCHR-CNJR-< appcode > | Production |
| S-S-C-RNCHR-CNJR-< appcode > | Stage |
| S-D-C-RNCHR-CNJR-< appcode > | DevInt & Workspace |
3 API Safes: These safes should be used for storing usernames and API keys specifically for accessing your secrets via api for development purposes using cyberark/summon.
| Safe Names | Landscape |
|---|---|
| S-P-C-RNCHR-CNJR-< appcode >-api | Production |
| S-S-C-RNCHR-CNJR-< appcode >-api | Stage |
| S-D-C-RNCHR-CNJR-< appcode >-api | DevInt & Workspace |
Safe Permissions (RBAC)
| Safe Names | Description | Access |
|---|---|---|
| S-P-C-RNCHR-CNJR-< appcode > | production application safe | ng-ngdc-< appcode >ops , ng-ngdc-< appcode >-dba |
| S-P-C-RNCHR-CNJR-< appcode >-api | production application api safe | ng-ngdc-< appcode >ops , ng-ngdc-< appcode >-dba |
| S-S-C-RNCHR-CNJR-< appcode > | stage application safe | ng-ngdc-< appcode >ops , ng-ngdc-< appcode >-dba , ng-ngdc-< appcode >-leads |
| S-S-C-RNCHR-CNJR-< appcode >-api | stage application api safe | ng-ngdc-< appcode >ops , ng-ngdc-< appcode >-dba , ng-ngdc-< appcode >-leads |
| S-D-C-RNCHR-CNJR-< appcode > | devint application safe | ng-ngdc-< appcode >ops , ng-ngdc-< appcode >-dba , ng-ngdc-< appcode >-leads , ng-ngdc-< appcode >-dev |
| S-D-C-RNCHR-CNJR-< appcode >-api | devint application api safe | ng-ngdc-< appcode >ops , ng-ngdc-< appcode >-dba , ng-ngdc-< appcode >-leads , ng-ngdc-< appcode >-dev |
Note : Member's would need to be directly added to the ng group to get access to the safe. Nested NG group will not have access.
How to create Account Manually in CyberArk
Please refer to KB0007418 - Privileged Access Management: Vault Account Manually to know more on how to vault an account. You can "customize the account name" to specify a simpler account name, it has to be unique within the safe .
Setting Up Secrets in Values Files for appstacks
The application team must use the CyberArk account to build secrets. You can specify the username and/or password for each secret. To enable CyberArk integration with SCALE, you must have a properly formed values.yaml file.
Step 1:
Upgrade your pipeline to v4.6. See release notes and pipeline upgrade tool.
Step 2:
cyberark:
  secrets:
    DB_USER: "sample_db/username"
    DB_PASSWORD: "sample_db/password"
    # API_TOKEN: "sample_api/password"
- Key Name (DB_USER): The name of the environment variable to create in your container.
- Account Name (sample_db): unique name of the account which you create in cyberark.
- Variable Name (username)/(password): Specify if the username or password field of the CyberArk secret should be retrieved.
Step 3:
Copy our cyberark-secrets.yml file and paste it directly into the templates directory of your repo.
Step 4:
Update the deployment.yml in your repo and add the 4 lines as done in our deployment.yml.
{{- if .Values.cyberark.secrets }}
  - secretRef:
      name: {{ include "app.fullname" . }}-cyberark-secrets
{{- end }}
Database Modifications for pre-v4.6 pipelines
Database passwords were previously stored in variable groups; with Cyberark, we can vault the secrets.
Upgrading your databases to pipeline v4.6 requires that you migrate/store your database credentials to CyberArk using the method described above.
In addition to the steps outline above, you will also need to perform the following steps for databases.
Step 1:
You will need to copy our secrets.yml to the top-level directory of your database repo.
*Please note: The secrets.yml file is specific to each database type/technology.
The link above is for mongodb. Please select our repo that matches your database technology and select the release/v4.6 branch.
Step 2:
Copy our cyberark-secrets.yml file and paste it directly into the templates directory of your repo. cyberark-secrets.yml
Step 3:
Update your values file as we have in our values.yml.
The link above is for mongodb. Please select our repo that matches your database technology and select the release/v4.6 branch.
We recommend that the account name that you create in CyberArk is unique for each database, since your safe may contain db credentials for multiple databases. For example, in your safe, create a secret that contains your mongoAdmin credentials and use <namespace>-mongoAdmin as the account name for easy identification and separation.
You should add the created account to two safes: one based on the landscape and another with the devint/workspace safe "S-D-C-RNCHR-CNJR-{{ appcode }}". This ensures that the workspace can access the password as well .
Step 4:
Remove the *.props reference from your azure-pipelines.yml file.
REMOVE:
- { group: mongodb.props }
Step 5:
Copy our deployment file for your database stack file and paste it directly into the your repo. , example for mongo - deployment-standalone.yaml . change from previous version is "secretRef" .
Conjur in CI/CD
Secrets are deployed before the application pod deployment, ensuring that when the pod comes up, the secrets are already available for consumption. Additionally, We have added to the sync Conjur manifest as a CI/CD step, allowing users to view and fix any errors before the deployment.
If the secret path defined in your values.yml file is incorrect, this task will fail.
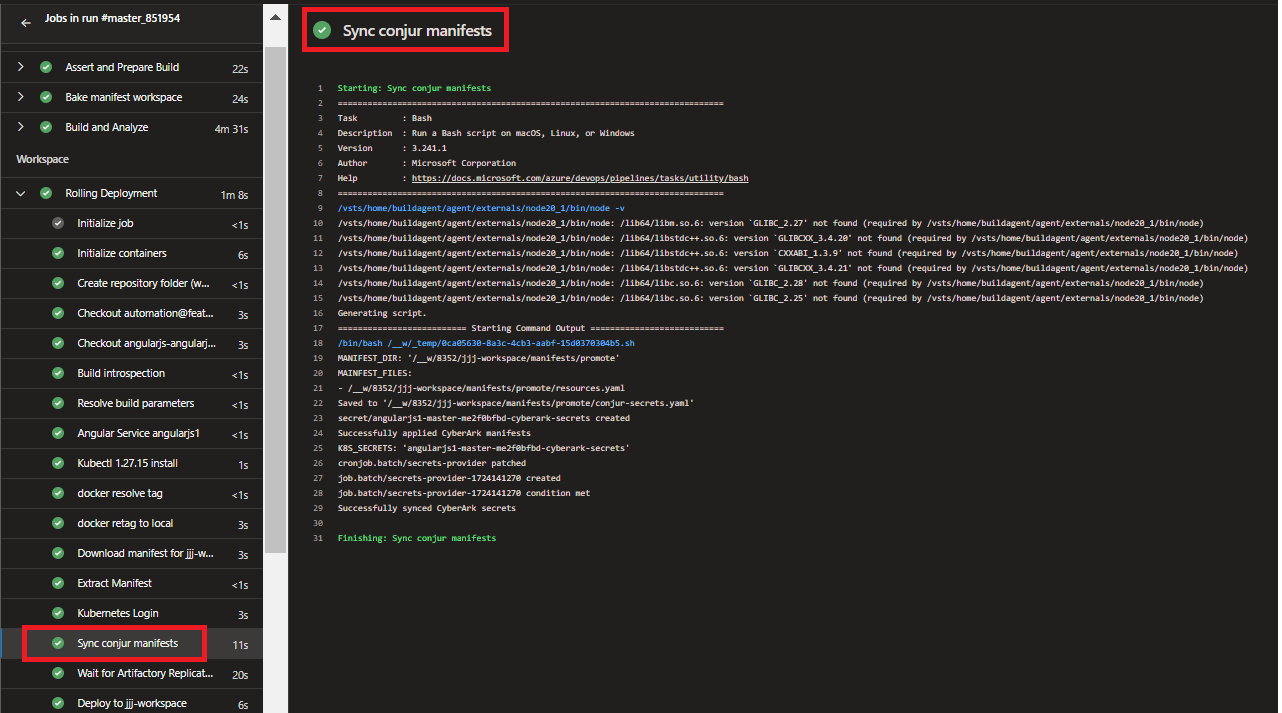
If you rotate your password in CyberArk, you will want to manually trigger the sync and restart your pods for your application to consume the new password. Refer to Trigger Conjur Sync in Rancher to manually trigger sync and restart.
How conjur works
More details about what is happening "under-the-hood": Secrets Provider for Kubernetes - Kubernetes Job - (cert-based authn)
Summon
Developers Guide to inject Conjur Secrets using Summon
cyberark/summon is a command-line tool that reads a file in secrets.yml format and injects secrets as environment variables into processes. In the current setup, secrets might be stored as variables on the local developer's laptop. By integrating Summon with Conjur, the developer community can securely store secrets in a vault, mitigating the risks associated with storing secrets insecurely on end-user laptops.
If you have any questions or issues configuring Summon, please open a ticket assigned to IT > FS > EUS > Identity Management Engineering
-
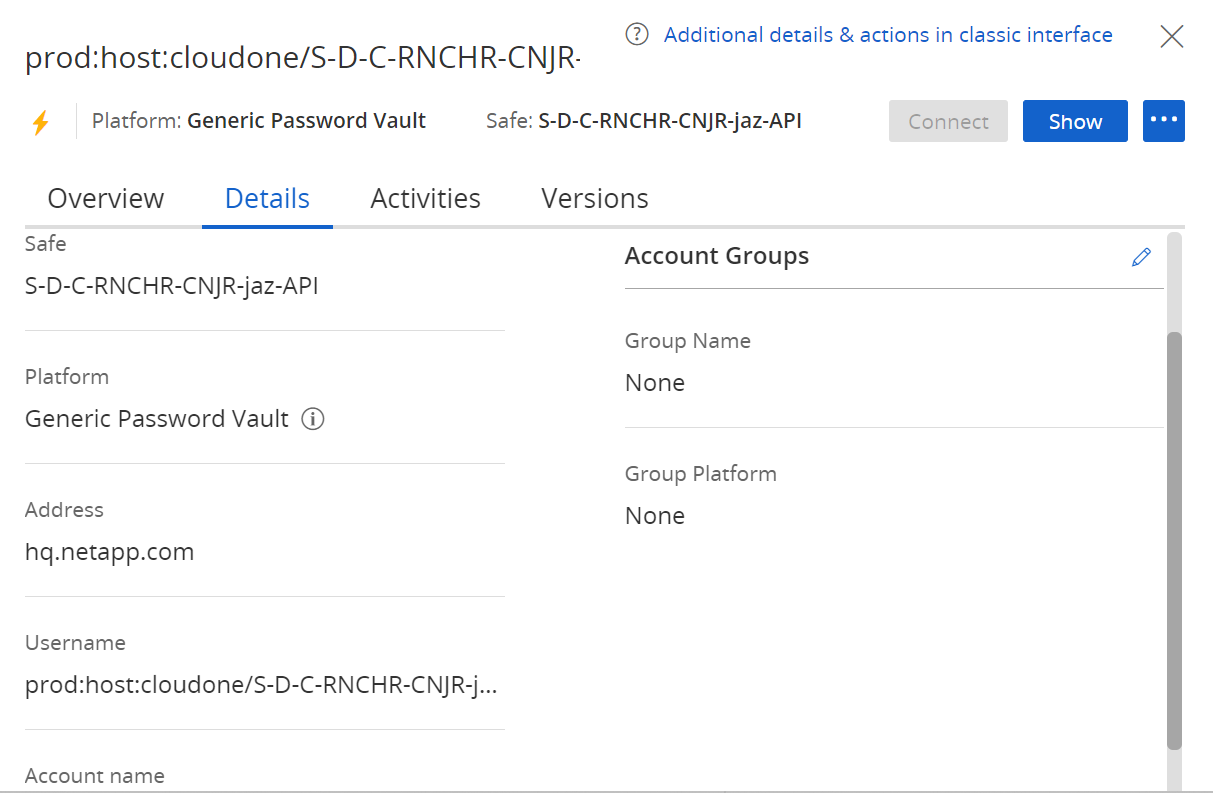
CyberArk Safes will be automatically created during workspace provisioning. Login in to https://pvwa.corp.netapp.com/PasswordVault/v10/Accounts and retrieve the username and password of your Dev/Stg/Prod Safe from the API Safes - > eg:
S-D-C-RNCHR-CNJR-< appcode >-api. Refer the below image.
-
Summon CLI Installation - Summon provides an interface for fetching secrets from a variety of trusted stores and exporting the secret values as environment variables to a sub-process environment. To setup summon download and install Summon cli and Summon-Conjur Provider. See the Summon GitHub repo for installation instructions. Download Summon CLI - https://github.com/cyberark/summon/releases Download Summon Conjur Provider - https://github.com/cyberark/summon-conjur/releases.
Note Windows Users should download .exe executable and linux users -amdx64 for both summon and summon-conjur
Local Workspace Preparation
- Place the summon.exe and summon-conjur.exe executables in the same folder. Preferably in your application source directory so as to execute it from there.
- Create a conjur.conf and place it in the same directory as the executables.
- Download Conjur certificate in .pem format (Download from the Conjur Application Safe -CORP SAFE S-P-C-VLT-CONJUR-CERT).
- Add the following content to the conjur.conf file:
---
account: prod
plugins: []
appliance_url: https://follower-west.corp.netapp.com
cert_file: <path to the conjur-conjur.pem file>"
cert_file should be the absolute path of the pem file
- Create secrets.yml in the same directory as the executables.
- Add the following content to the secrets.yml file:
Name of the secret variable to be used in the application codebase>: !var secret variable to retrieve from pvwa.
Coin the secret variable like this - prodvault/CloudOne_LOB/<-SafeName->/<-accountname->/<-variablename->
Account Name is the unique name of the account that you create in CyberArk.
Variable Name is the username or password field of the CyberArk secret that should be retrieved.
Refer the below template.
SECRET: !var prodvault/CloudOne_LOB/S-D-C-RNCHR-CNJR-jaz/sample_db/password
- Open Command Terminal as Administrator and set the following environment variables.
This is the username and password retrieved from Step 1.
Note that the username should look like - host/cloudone/
windows:
set CONJURRC=<path_to_executables_directory>\conjur.conf
set CONJUR_AUTHN_LOGIN=<username> host/cloudone/<SafeName>-id1, SafeName depends on the lanscape.
set CONJUR_AUTHN_API_KEY=<api_key> This is the password to the hosted account in pvwa.
linux:
export CONJURRC=<path_to_executables_directory>\conjur.conf
export CONJUR_AUTHN_LOGIN=<username> host/cloudone/<SafeName>-id1, SafeName depends on the lanscape.
export CONJUR_AUTHN_API_KEY=<api_key> This is the password to the hosted account in pvwa.
Consume secrets in application.
- Run Command Prompt as Administrator in your application source directory.
- Run below command to test secret retrieval from Conjur:
For Windows users
summon.exe -p .\summon-conjur.exe powershell.exe -c "Write-Output $env:SECRET"
For Linux Users
./summon-linux_amd64 -p ./summon_conjur_linux_amd64 bash -c 'echo $SECRET'
If you get network unaccesible issue please nslookup follower-west.corp.netapp.com and make sure it is reachable from your terminal.
This retrieves the secret from conjur and prints the same in powershell. 3. To run a springboot application and inject secrets to it use the below command:
summon.exe -p .\summon-conjur.exe mvn:spring-boot:run
The secret is now injected as an environmental variable and is ready be used in Springboot as a system environment variable.
Trigger Conjur Sync in Rancher
Our automation has created a secret-provider cronjob, acting as a sidecar, is responsible for interacting with the CyberArk service and retrieving secrets. This job runs every 24h to sync any CyberArk secret changes to your namespace. Once the secret has been synced to your namespace, your pods will need to be restarted to consume the new secrets.
If you have made changes to a secret and need it to be immediately consumed by your application, you will need to manually trigger the sync job and restart your deployment/statefulset. To run the Job immediately, you can run the command kubectl create job --from=cronjob/secrets-provider manual1 or perform the following steps in the Rancher UI:
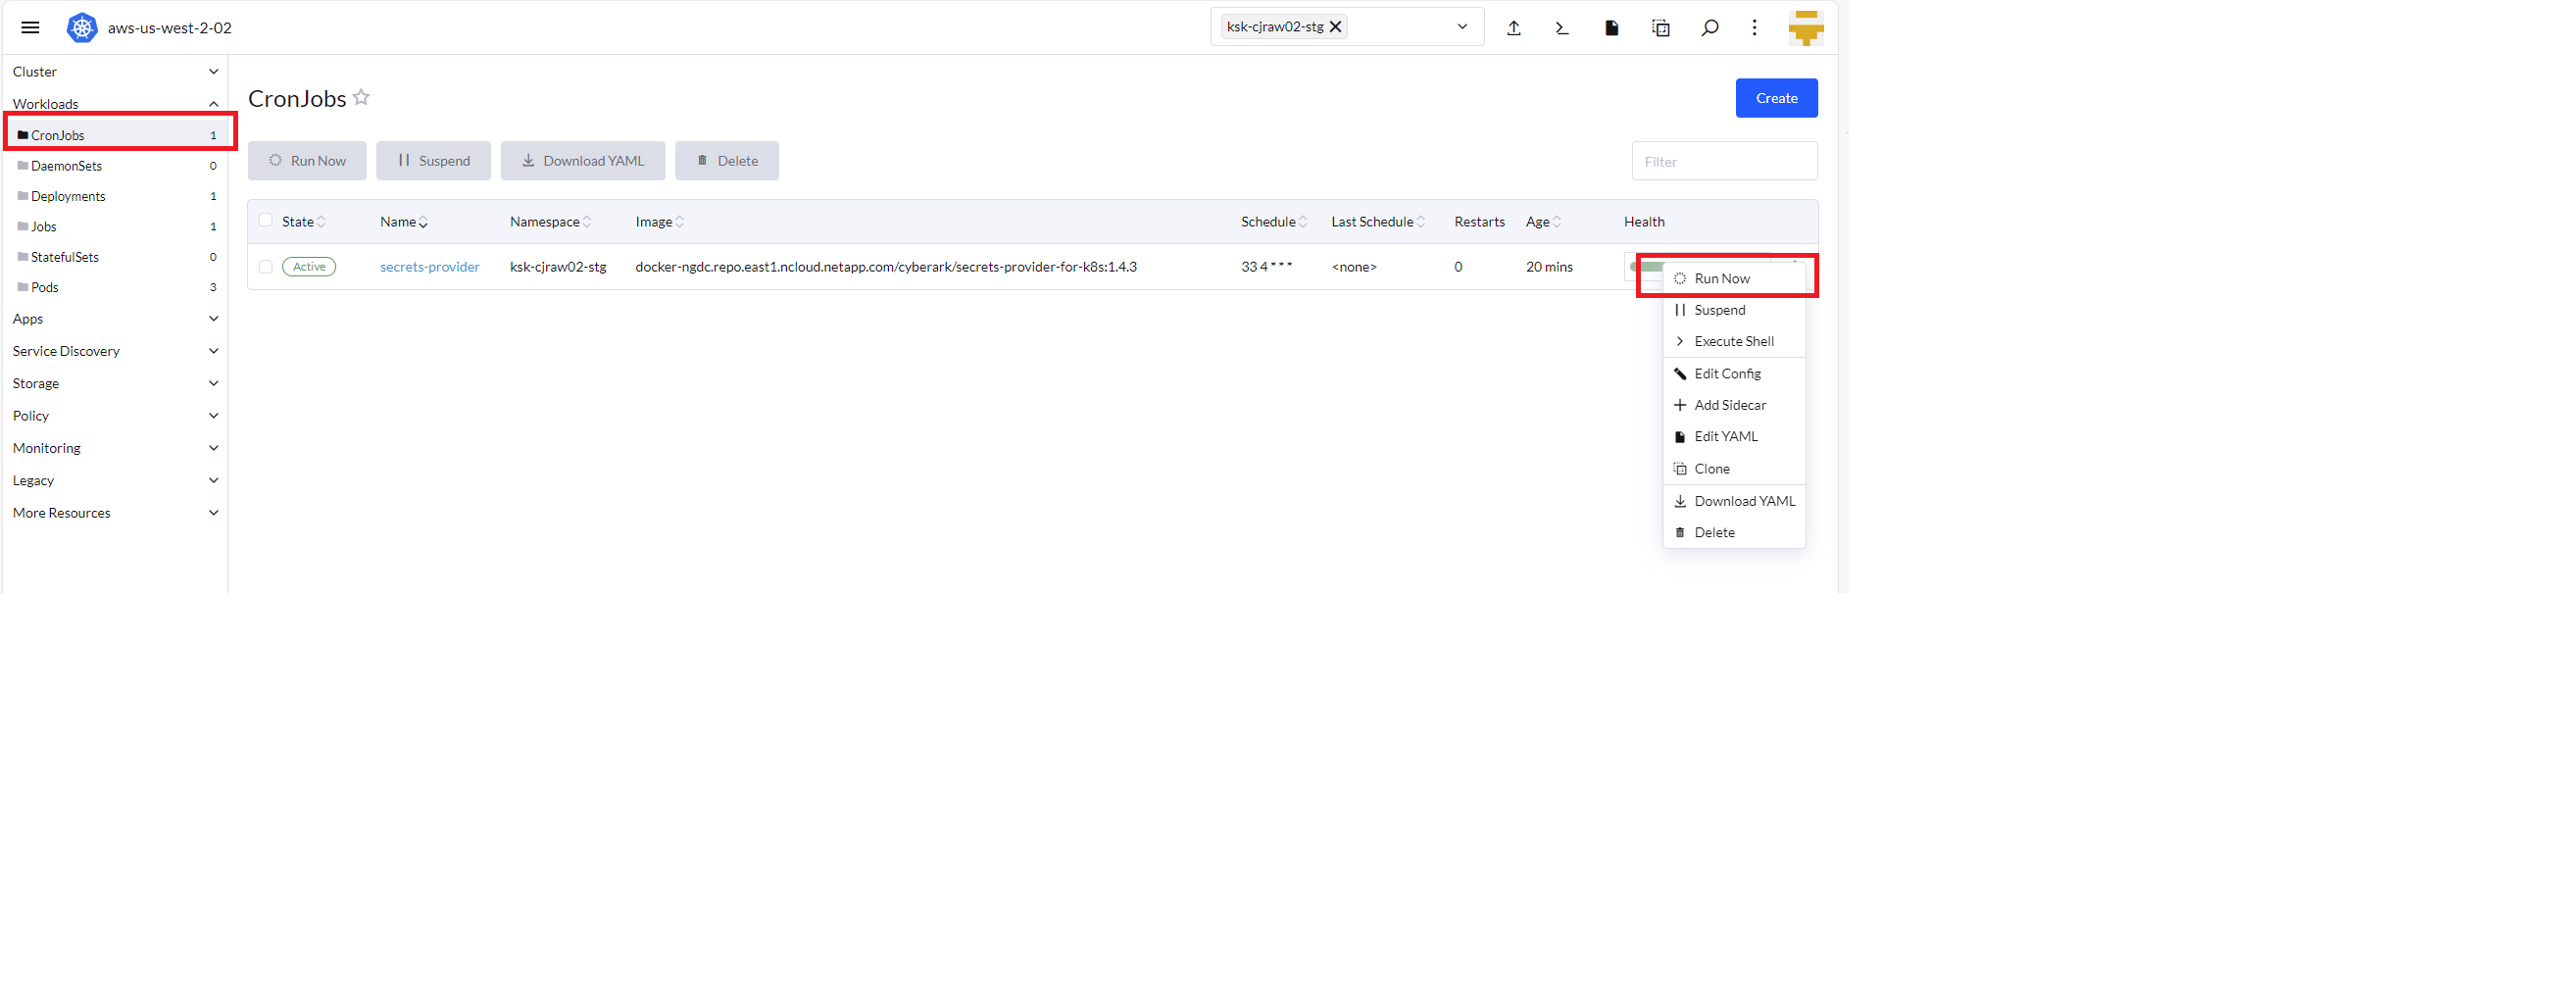
Please allow up to 5 minutes for the sync job to finish. Once finished, you may manually restart your deployment for you application to consume the newly synced secrets (kubectl rollout restart deployment <deploymentname>).
If the Kubernetes secret is getting created for the 1st time, your deployment will fail to start and you will need to manually restart the deployment (kubectl rollout restart deployment <deploymentname>).
If your secret is not getting injected into your container, please contact L2 support at
Troubleshooting
If the Sync conjur manifests task in your pipeline fails, it should contain information about the issue.
For example, if it gives an "exceeded quota" error, you will need to perform one of the following:
- Manually delete the current deployment in Kubernetes, update the limits in your values file, and redeploy.
- Manually update your existing deployment in Rancher and decrease the CPU limits, update the limits in your values file, and redeploy.
- Increase your hostspace tshirt size through the Service-Now DevOps portal.